
After rebuilding my Wasp 232, it developed an oil drip. Upon further inspection the oil was seen coming from the front plate and timing cover gaskets. As time (about 2 years) has moved on, the drip has worsened; it looks as if the gaskets are saturated with oil. When assembling the engine I did as always, a little #2 Permatex on both surfaces.I have tightened the bolts with little effect if any. I did notice that the tappet cover gaskets are not leaking and I had used silicone gasket sealer with those gaskets.
Has anyone else had problems with these "Best" brand gaskets, if not did you do anything different with sealant? I've got new gaskets coming BTW.
Thanks!
Bruce,
I had bought mine from Dale Cooper. NO problems. Long story short. I had problems getting the head gasket to quit weeping despite torquing the head as suggested in the manual. Learned a few other things about that here as well. I did not replace that front gasket and wish I had. Mine leaks a little. Not uncommon for these engines. But there''s no noticeable oil loss and not getting worse. I don't like the mess. Come by and visit sometime and bring your car whent eh weather's a little better and let's compare notes.
Have always thought cork was porous and have put RTV Silcone on the inside edge so oil couldn't come thru. Molded silicone gaskets are better of course, but set up cost for this on low volume Hudson gaskets doesn't compute. Cork is cheap and easy to cut out, but put RTV on edge to prevent weep~~~ 2 cents
I believe you'll find that Dale sells Best. I can't imagine that many gasket makers produce Hudson. If you buy from Olsen's, they'll be Best as well.
Some of those capscrew holes go through into the tappet chamber or crankcase so oil may be seeping through the threads from those. Wipe it clean and watch to see where it's coming from. I know.....easier said than done.
F
Tim,
There are sealing rings around all of the coolant passages and, of course, the combustion chambers but [i]not[/i] the head bolt holes. So, if the threads leak coolant, it will come up the threads and into the part of the head gasket that is NOT necessarily water-tight. It will then find its way to the outside world wherever it can. The answer is a good cooling system sealer. Nothing to lose, and it might stop it.
I like to use a LocTite product made especially for head bolt-to-water jacket at initial assembly. It's a tedious procedure, but worth it in the long run.
F
Ditto what Frank has recommended. If your cooling system has been restored correctly, and/or is in top operating condition, all surfaces are parallel for matched mating , cylinder head torqued proper, with preferably new head bolts, a good block sealer is always welcome. We do this with most engines. We also make the cooling system 'Full pressure" when restoring the radiator on earlier models as well, installing a 4lb. cap when we are finished. When done properly, you really don't notice the overflow tube being relocated. .
[quote="Frank Hughes" post=8613]Tim,
There are sealing rings around all of the coolant passages and, of course, the combustion chambers but [i]not[/i] the head bolt holes. So, if the threads leak coolant, it will come up the threads and into the part of the head gasket that is NOT necessarily water-tight. It will then find its way to the outside world wherever it can. The answer is a good cooling system sealer. Nothing to lose, and it might stop it.
I like to use a LocTite product made especially for head bolt-to-water jacket at initial assembly. It's a tedious procedure, but worth it in the long run.
F
I think you should clean it all off again, run it a little and see if you can see where it drools. If it is at the bottom, purchase a new frt. support plate gasket, timing cover gasket, and change it. When taking it back apart, pay close attention when removing the frt. support plate to where the leak is. It should be evident where-it will usually be where the gasket IS NOT glued to the plate and/or the block. Inspect that area closer, make sure everything is very clean and the frt. support plate is not bent. As also mentioned in this thread, make sure that you seal all of the frt. support plate bolts, except the 2 lower corners, as some are in coolant and some are open to the crankcase.
I am going to add, "seal all bolts in frt. support plate". The more I thought about it, splashers have a bottom hole that goes directly into the crankcase. Also, seal the frt. 4 bolts in the oil pan! This is a must!
Thanks Doug! Yes, it is at the bottom. More annoying than a problem really, so I just haven't the gumption to do as you suggested yet, but that's exactly what it needs . It will surely wait a bit longer since I broke my wrist. Driving the Hudson is off for another 2 months! 🙁
Tim, it is the easiest-if there is such a description when doing this in chassis, using the engine lift over your shoulder.
[quote="Doug Wildrick "Dr Doug"" post=8640]Ditto what Frank has recommended. If your cooling system has been restored correctly, and/or is in top operating condition, all surfaces are parallel for matched mating , cylinder head torqued proper, with preferably new head bolts, a good block sealer is always welcome. We do this with most engines. We also make the cooling system 'Full pressure" when restoring the radiator on earlier models as well, installing a 4lb. cap when we are finished. When done properly, you really don't notice the overflow tube being relocated.
Doug, If I understand this right, you change the radiator cap snout to a closed system type that has a "catch can" and then put a 4lb cap on it. Why not a 7lb cap? Just trying to learn about this.
I guess a 7lb. cap would work fine. If you use a higher rated cap, then the flex of the brass tanks can be of concern. They are 60 + years old, are usually thin and can crack easily.
The big, flat-sided tanks are subject to considerable flexing during warm-up and cool-down periods in spite of the stiffening ribs. Our Hornet would go "boink!" a couple of times in the first few minutes of warm-up and do so again at cooling. Cracks had already been soldered at the ribs but were beginning to leak again, at the bottom tank, so I replaced it with an aluminum radiator.
If you are using an original bellows type t-stat and convert to a pressurized system, you may experience cyclic overheating/cooling problems. A friend put an aluminum radiator in his '46 coupe, utilizing one spec'd for a SBC in a Model T. Nice fit and would have worked great but he failed to note that it says "1.1 Bar" on the cap. Yikes! That's ~16 psi! He called me about his problem of having it overheat, then rapidly cool back to normal, then overheat, and return to normal.......numerous times before he got back home.
The Bellows type relies on expansion of the air inside of the bellows to push the valve open but if your system is developing pressure as you warm up, the bellows can't overcome the rising pressure on its outside (outside of the bellows but inside of the pressurized cooling system). It eventually heats up enough to blow-off the cap, reducing the system pressure and allowing the bellows to push the t-stat to the open position and the temp drops.......for a while 'til the cycle starts over.
Frank's opinion: I wouldn't go over 4 psi with a stock pre-stepdown radiator. I suspect that the repeated expansion/contraction would produce tanks cracks sooner than later. New cores can be had.....new tanks not. Not sure what issues may develop with the water pump seal at elevated pressures in a pre S/D. I converted my '47 to a double row ball bearing and hot rod seal so it wouldn't care. I've always wanted to pressurize it as well, but.............maybe some day.
Frank
interesting and good info to have. Both ones I am working on now have new aluminum radiators. I'll have to be sure to get a modern thermostat.
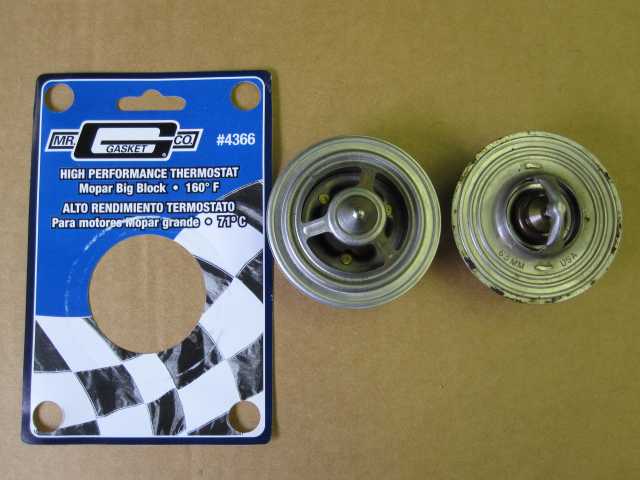
Be sure and look at this one>>> www.Jegs.com. The 160 degree one is #720-4366. new on left; others on right; area 4 times more?? Does good for me.
We use aluminum radiators. If you look on our website, several cars have the aluminum radiators, which seem to work well.. We also change the thermostats to a modern type. They are readily available in various temp. ratings. Block off the by-pass, drill a 1/8th hole in them to insure no cavitation. I believe Walt Mordenti still sells a conversion kit?.
