
Hello all,
I'm a new HET member, and getting familiar with my new '36 Terraplane 61 Brougham. I've been a Nash and AMCRC member for many years, but this is my first foray into the world of Hudsons (so glad to finally have one of my own!).
This car is in great overall shape and runs/drives nicely, but like anything this old it needs attention here and there. First up is the wiring; it is a mix of old and new, and it's got a lot of crimp connectors and electrical tape holding stuff together. Reliability is priority #1, so all those potential problems have got to go. I want to try to restore the factory-correct wire runs and device locations, but I don't have any good references. Specifically, I am looking for information on the following:
1. What is the factory placement of wire looms and firewall penetrations?
2. What types of wiring were used? (cloth covered, armored cable, or both?)
3. Where is the fuse block supposed to be located?
4. Does anyone have an unmolested '36 Hudson or T-Plane that can be used as a reference?
Some other observations while I'm rambling...
The car does not appear to have ever been equipped with Electric Hand, yet it has the cane-type parking brake under the dash. There is no hole in the floorboard where the lever-style brake would be, and the installation looks original to me. Does that make any sense?
Oh and one more question: does anyone know the proper installation of the throttle and brake pedal return springs? They're clearly not right on mine!
Thanks for all your help!
Welcome, Alan!
You may wish to state where you're living, because possibly one of the denizens of this Forum might live near you AND have a '36 Terraplane (or Hudson" you can look at.
I seriously doubt you'll be able to find a dimensioned chart showing the precise layout of the correct wiring harness for your car. And it's dubious that anyone would be willing to rip theirs out, so you could sketch and measure it! So, your options are reduced to two:
1. Go to a commercial company that will assemble an original harness for you using the same sort of cloth-covered wire and connectors as your original one. This will cost you several hundred dollars. Three well though-of such companies are Narragansett Reproductions, Rhode Island Wiring, and YnZ's Yesterdays Parts. Some of these companies will also sell you the raw materials if you want to.....
2. Construct your own wiring harness, which will be much cheaper but won't be authentic. First, make sure your wires are all in place and are long enough to reach their desired components. Then try to tie together the wires that "travel together" to form the "branches" and "main trunks" of your wiring tree. Then pull them out of the car, from under the dashboard, and staple them to a 4 ft. x 8 ft. plywood sheet so you can work on them. At that point you can use this 3-dimensional "diagram" as a mode with which to construct an identical harness using modern plastic-covered wire. Be sure to use the correct gauge wire where needed. Actually, you can purchase the old style black tar-covered cloth flexible loom material, in different diameters, and run the wires together through them, so that your harness now has its original "branches" back, and these will hide the plastic covered wire so that (where visible) your harness won't look TOO modern.
As noted in (1) above, you can actually buy the authentic cloth covered wire instead of using modern plastic stuff. Or, use the authentic stuff only in the engine compartment where it will be seen. The plastic stuff would be under the dashboard.
When you construct your new harness, you can insert new wires to serve functions that the old harness wouldn't have supported: for example, you could run wires to a new left and right turn signal light (the '36's didn't have turn signals but you might want to add them). You could add a high beam indicator on a bracket under the dash, and run a wire from that to the floor dimmer switch.
Until you deal with the wiring, ALWAYS disconnect the battery when the car is not in use!
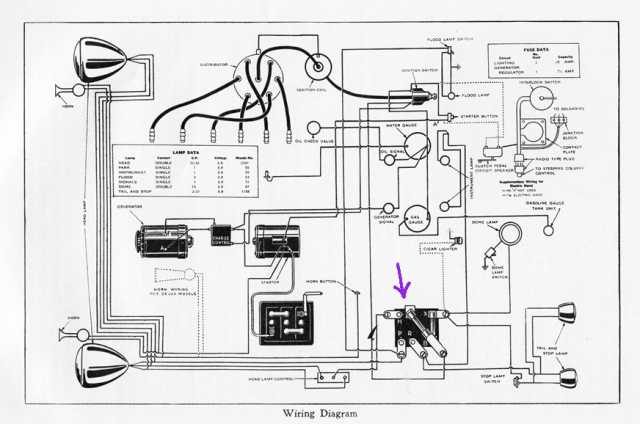
There never was a fuse block. Where Hudson used fuses they were either inline, or mounted to the switch (for instance, the headlight switch has one or two fuses in it). You'll find a wiring diagram in the 1934-39 Shop Manual, which you should now be able to access from the on-line library here at the HET website, since you are (presumably) a full member of this website.
That same shop manual MIGHT show you a photo of the springs you're curious about, too.
The cane type brake would not have had any relationship to the Electric Hand. The pull-type brake handles were in some 1936 models, the floor-mounted brake handles in others. It had no bearing on whether the car had Electric Hand.
Welcome aboard, Alan. Attached is a shot of part of the firewall on my former '36 Hudson. Entries on it would be same as Terraplane. This car is generally recognized as the most accurately restored '36, which was my goal, but of course there could be an error here and there. Email me for more pic's. pwald@comporium.net
Hope someone with an unrestored original Terraplane can weigh in here and provide other photos.
Park, how did you go about determining the route of the wires, which ones traveled together, and so forth? Did your car (or a parts car) come with a fairly original harness or did you have to do any research? Did you save the old "master harness" when finished?
There's been some discussion over the years about developing individual "restoration books" for each year of Hudson, and a dimensioned diagram of the harness would be invaluable for such a book. I rather imagine, thought, that such a diagram only exists in the files of Y n Z, Rhode Island Wiring, etc.!
Jon, in spite of the car's having passed through a couple of hands in the previous 10-15 years, the wiring was pretty much untouched. And I used some service manual and other factory photos. As said, I could have made some errors, but there aren't really many logical alternatives to the routing. Certainly the preferred reference would be a known-to-be original car.
I have built my own harness and I have purchased them as a new product. I did the harness on my 36 because it was a Coachcraft built car and was not like the harness on factory built cars. Also, I wanted to add in directional signals and extra brake lights. Buying one already constructed is a much better way to go and the vendors listed above do an excellent job. I did find with my 54 harness that I needed to shorten some wires to make the fit better and also there were a few wires missing from the prepackaged kit.
Thanks everyone for such great help. I have removed most of the electrical rat's nest, and feel better knowing that the new wiring will be done right. The real shame is that years of adding wiring clamps and mounting stuff in the wrong location has left the car with a firewall full of holes. I'm trying to decipher which are factory and which are not, although the jagged and irregular ones are pretty obvious. Gonna have to fill-in all those that don't belong.
I know Jon said there was no fuse block, but the wiring diagram from my '36 owner's manual shows something similar to one (see attached). Does anyone know where this item was actually located?
When I was restoring my 1920 Nash coupe, I found a company out in CA called Restoration Supply Company, who have pretty much everything required for period-correct electrical materials. I have no problem making the harness myself, but figuring out exactly what I need is the hurdle of course. I know I'm getting into the gritty details, but hopefully you don't mind a few more questions:
1. The owner's manual talks about the headlamp switch being a three-position rotary switch; left for parking lights, center "off", and right for driving lights. No mention of an instrument dimmer. Can anyone confirm if this is what was actually used, and whether it was unique to Terraplane?
2. The front compartment "floodlight" is missing from this car. The manual describes it as being activated by a toggle under the dash, and that it had a 10" lead to give it some mobility. What did this look like and how was it mounted?
3. I'm assuming positive ground for all Hudsons at this time?
4. There doesn't appear to have been a horn relay originally. Is there any reason why one would be needed?
I probably will add a turn signal circuit, as well as a circuit or two for future accessories, but I'm going to make every effort to make them look like they belong.
Thanks again for the help! By the way I'm in New Hampshire if anyone is close by...
Alan, have you been in contact with Jim DiGiorgio?? He's president of a great chapter, the New England Chapter. He'd love to hear from you. Either e-mail him at xxx1934Hudson@charter.net (drop the xxx). I've been a member of the New England for over 40 years - great bunch of guys. Tell Jim I sent you.
Hudsonly,
Alex Burr
Memphis, TN
To answer your questions:
1. There was no instrument lamp switch or dimmer that I know of.
2. The "floodlight" merely refers to the lamp that lights both the glovebox interior, and the floor below it (at least, if the '36 floodlight is like the '37). The light socket has those little 'fingers' around it, so it snaps into a little metal bracket riveted to the side of the cardboard glove box. The light is not removable (as some sort of portable flashlight might be). The switch is a simple chrome plated 2-positioni toggle switch mounted to the flange that turns back, below the instrument panel. It faces downward. If yours is missing you can probably find a similar one at a flea market or one of the electrical supply places for antique cars.
3. Positive ground? Yes.
4. No horn relay on this model. Actually, one was used on the Hudson Eights in '36, and on certain '35 (and maybe earlier) models. Not sure why they didn't use them. You can find them on Ebay, NOS, since they fit so many cars.
Finally, you mention the fuse block. What you are seeing, on the wiring diagram, is a drawing of the underside of the light switch. It has many terminals and two fuses, I believe.
Thanks Jon- you're absolutely right about that being the headlamp switch. Now all I have to do is find one!
Is there any chance that someone can snap a photo of the floodlight/glove box light for reference?
I'll have to reach out to Jim DiGiorgio; I'd like to get involved with the NE club. The only problem for me is that I'm way up north on the NH/VT border, and it seems like the regional clubs are all located down in southern New England (flat-land) which can be quite a hike. The Nash and AMCRC club is the same way though...
Here's a shot of the glove box of Greg Maroney's 1937. My guess is that the '36 is similar. Note the large hole in the side of the glove box, with two smaller holes at each side of it. The bracket holding the floodlamp is fastened to the outside of the glove box with two screws (not shown) passing from the inside, through the cardboard into the metal of the bracket. The bracket is L shaped. The horizontal leg (parallel to the floor of the car) has a 5/8" to 3/4" hole in it. Into this hole is snapped the light socket, with the bulb facing downward. The vertical leg of the bracket sits against the side of the glove box but is open; light pours through the opening and the hole in the glove box, to illuminate the interior of the glove box. Additional light spills down onto the floor of the car below.
[img]  [/img]
The best chance you have to obtain the bracket is by e-mailing the vendors who advertise in the WTN, and asking them if they happen to have any of these...or even if they have an old glove box complete, salvaged from a '36. (There are still derelict '36's out there from which people are still salvaging things.) The light sockets themselves are still being manufactured nowadays. They will have the "fingers" so they'll snap into the hole in the brakcet.
[img] 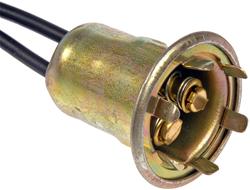 [/img]
Just be sure to get the correct socket for the bulb that goes there (should be listed in your owner's manual).
The switch is a chrome toggle switch that screws to the underside of the dash near the glove compartment. I have seen these at Hudson flea markets in boxes with tons of other stuf. With any luck you can find the whole setup (switch and bracket, screwed to the remnants of a glove box) at a flea market.
By the way, you can purcase a repro glove box for your car. I think Vintage Auto (Bill Albright's company) sells then.
I have a Hudson repro parts webpage [url= http://www.detailedconcepts.net/Repro_Table.pdf ]HERE[/url]
Alan,
I'm a long time owner of a 1935 Hudson. I live in Boston. Sometimes I visit a friend in Quebec city, so I could pass by to visit!
Per,
I'm just a couple minutes from I-89, feel free to stop by...
Alan,
Great! I'll let you know when I am visiting my old friend, Tom Feininger, who is a member of the Quebec HET chapter.
Per
[quote="Alan Owens" post=8086]
I'll have to reach out to Jim DiGiorgio; I'd like to get involved with the NE club. The only problem for me is that I'm way up north on the NH/VT border, and it seems like the regional clubs are all located down in southern New England (flat-land) which can be quite a hike. The Nash and AMCRC club is the same way though...
Not a problem Alan. Plan, at least, next year on a trip to Carl Webers annual meet in October. And if there's any reluctance on your part consider Carmen LaFlamme, the HET national secretary. She always goes to Carls meet, at least, and she lives in Richmond - Vermont!!!
And then there's Michel Jodin over in Compton, Quebec, who's been hosting an annual meet over there the past few years.
I used to live in Southern Maine and most New England meets were at least 70 to 100 miles away for me. Just makes for a long drive.
Hudsonly,
Alex Burr
Memphis, TN
