
So, I've pulled the transmission/Overdrive/Bellhousing in order to replace a failing throw out bearing, to replace all leaky gaskets and seals (thanks Dale C!) and to assess the internals of my 49k mile 50 Commodore.
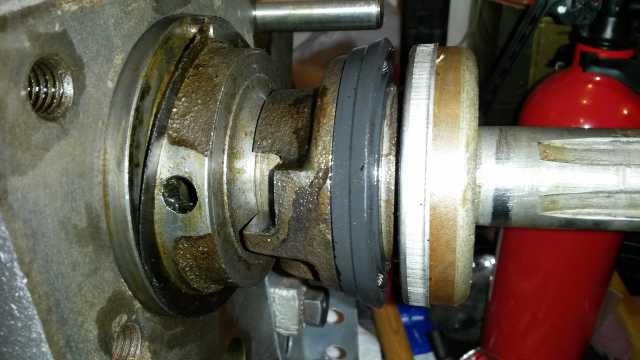
I am new to Hudson, but a not to busted knuckles and oily bits. Something that has eluded me is an understanding of how bearing grease can get from the intended fitting on the side of the bellhousing into (and only into) the balls of the thrust bearing on the throw out collar.
Well, with the parts out in front of me on the bench, it has become clear. The short answer is that the lube enters the bearing retainer at the clutch shaft, then with the help of strategically placed seals at the transmission and on the inner diameter of the throwout collar, the grease follows the clutch shaft forward and is directed radially into the balls of the thrust bearing. Amazing!
I've been told the grease actually lubricates the transmission bearing or the surface the throwout bearing rides on; however, the parts speak for themselves and for the Hudson engineers. Clever.
The main attachment is made up of two images taken from the service manual, merged together along with some arrows showing the critical components and the lubrication path.
I hope this helps all those who are curious.
Pat
![]()
Thank you Pat. Very informative.
Lee O'Dell
The throw out bearing is a sealed unit. All the grease job does is lube the fingers and the shaft. Just remember, never use a high powered grease gun as that will force grease into the clutch. Only use a hand held grease gun and only 2 pumps every 5,000 miles. Also never grease the king pins with a high powered grease gun as that will blow out the expansion plug that has the release valve. Use only a hand held gun for this also till you see grease coming from the valve. Walt.
Hey Walt,
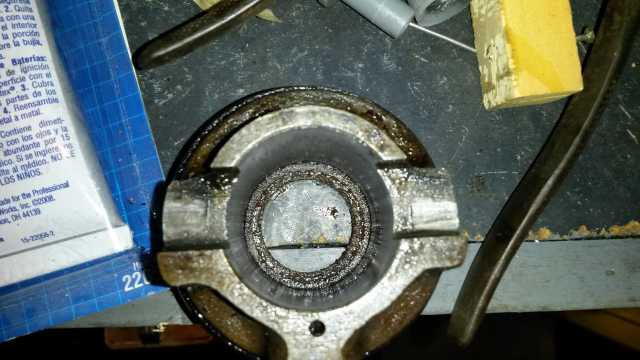
With all due respect, especially to your technical knowledge, Walt, the throwout bearing I removed and the one I am installing definitely has an open path to the balls of the just inside the small inner seal. In addition, there is a small hole on the collar, parallel to the shaft, that leads to the balls.
I learned this by running kerosene into it to rinse out the old NOS grease and watching it come out near the lower seal. I then primed the bearing with bearing grease by gently doing same.
I can send some additional photos if it helps.
Does Doug (Wildrick) or anyone else produce a newer style with a completely sealed bearing?
Best Regards,
Pat
Hello Pat. You have described how it lubes perfectly. No, we still use the same type bearing you have pictured. There is no reason to re-invent the wheel. Something to add to your thread is make sure that you use a good HP grease when lubing the T-bearing. Standard chassis grease is not usually 'High Pressure" and can cause pre-mature bearing failure. The inner t-bearing leather seal is a very important feature in this design too. If it is not there, it allows dirt to enter the collar over time and get into the t-bearing,causing damage. The reason, as Walt pointed out, just a couple of pumps. The grease does NOT come out anywhere you can see, so pay attention when greasing it. If you have someone else do your chassis lube, make sure that you tell them about this. I too agree that Walt has been so helpful with his technical expertise in Hudsons-thanks again Walt!!
Doug, Good point on the callout of HP grease instead of Chassis grease; I only stated "bearing" grease, but to your point, when someone sees a traditional grease fitting, their very likely to pump in Chassis grease.
I have noticed the small hole of the collar will allow excess bearing grease to escape, but only after is forced through the balls of the bearing. I don't know whether this is viewable from beneath with the lower flywheel cover off and wasn't smart enough to look before disassembly. But, to Walt's point, going with just a couple pumps is still the safest approach.
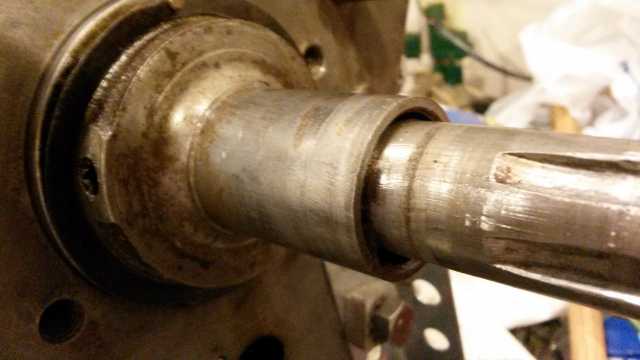
You'll notice in the photo in the original post that the groove of the clutch shaft, showing how the years and miles of the inner seal taking their toll. I am researching adding a speedi sleeve to the clutch shaft such that the seal is always riding against the sleeve throughout the throwout bearing's movement along the shaft.
Also, it appears to be a good idea to soak the outer seal with Hudsonite oil prior to reassembly into the sealed clutch housing.
Pat
Well, the idea of adding a speedi sleeve (from SKF bearing) or redi-sleeve (Timken bearing) to the clutch shaft is not recommended by the manufacturers because the splines will put small ridges in the sleeve, rendering a soon to be leaky surface. The exception is that if the spline diameter is smaller than the seal surface, but I don't expect that is the case, nor do I think reducing it is a good idea.
The second issue is that although I can find a sleeve of the perfect diameter, the length is only 0.313 inches, which I doubt is enough given the motion of the throw out collar and the change in location as the clutch cork wears thinner.
I am not sure how bad my clutch shaft is, but other than finding a NOS shaft, or very good used, has anyone sleeved such a shaft? Or machined one gently?
Here's another closeup photo.
Thanks,
Pat
I have found when there is a groove on the input shaft, usually means the clutch was chattering and/or the pilot bearing was bad or installed wrong. If you install a new inner leather seal, this will probably be enough to stop the fluid from running out and no other repair will be required. Always inspect the input shaft for twist or being bent. Also when re-installing the throw-out bearing collar sleeve-[part where the front seal is]- clean that gasket if you are re-using it, and put a very light coat of sealer on it before driving it back into the bell-housing. Also, make sure you seal all 6 bolts in the bell-housing before installing it onto the trans. If you don't, they will leak gearlube and you will have no access.
Doug, thanks again for sharing your experience. It is greatly appreciated.
Yes, I've noticed that the Hudson transmission does indeed have many through fasteners requiring clean threads, holes and sealant. Good point on those six up front.
I wouldn't have thought of the connection to a bad pilot bearing or bent shaft. Again, thanks.
By the way, I think you know my car personally as it was Larry K's up until about 10 years ago, when it was sold to a man near me in Dayton, OH.
The inner seal on my replacement is a nice thick leather piece; much better than what was removed. Since I dont' think a sleeve will work, I'll treat the shaft to some 1000, then 2000 and polish.
I am quite behind in updating this thread for project results. Finished the job back in March and I am happy to convey that the clutch, transmission and OD rebuilds have yielded great results. The clutch is smooth and the transmission action is much, MUCH better.
Thanks for all the help.
Pat
Pat, better late than NEVER !! I hope to see that car out sometime in the near future !!
Doug, YEAH! Soon each of us will think the other does not really exist.
Pat
